The cucumber (Cucumis sativus) has a rich and fascinating history that spans thousands of years. Native to South Asia, particularly the region encompassing India, cucumbers have been cultivated there for over 3,000 years. The evolution of cucumbers from wild plants to widely grown crops highlights their adaptability and the exchange of agricultural knowledge among ancient cultures.
The first farmers in India began cultivating cucumbers, selecting traits that made them more palatable and useful. Due to their refreshing taste and hydrating properties, cucumbers quickly became a dietary staple in ancient times.
The spread of cucumbers to the Middle East, brought by Indian traders, led to their popularity in ancient Egypt and Mesopotamia. Egyptian records from around 2,000 BCE show that cucumbers were a beloved food, often depicted in tomb art, and valued for their cooling effects in the hot desert climate. The fruit also found its way to Africa, where it became an important part of local diets and farming practices.
Historically, cucumbers have been associated with health and fertility. Today, they are often linked with wellness and relaxation. The phrase “cool as a cucumber” originates from the belief that cucumbers provide soothing and refreshing benefits, both in cuisine and traditional medicine.
The cucumber’s enduring history demonstrates its significance in agriculture and human culture. Though it originated in South Asia, cucumbers have been cultivated across the globe for thousands of years, nourishing and refreshing people throughout history.
Cucumber Growth Stages
Understanding the Cucumber Growth Stages is key to successful cultivation, as each stage demands specific care to ensure healthy and productive plants.
Stage 1: Germination
The first phase in the Cucumber Growth Stages is germination. Cucumber seeds absorb water through a process called imbibition, causing them to swell and split open, allowing the embryonic root (radicle) to emerge. Under ideal conditions, germination occurs within 3 to 10 days. The optimal soil temperature for germination ranges between 21°C and 35°C (70°F to 95°F), and the soil should be moist but well-drained, with a pH of 6.0 to 7.0.
After germination, the cucumber plant enters the seedling stage, marked by the appearance of the first true leaves, or cotyledons. During this stage, the plant focuses on establishing a robust root system and initial foliage to support further growth. To ensure healthy seedlings, provide them with 12 to 16 hours of light daily and keep the soil consistently moist but not waterlogged.
Stage 2: Vegetative Growth
In the second stage of the Cucumber Growth Stages, known as vegetative growth, the cucumber plant experiences rapid development. Leaves and roots expand vigorously as the plant prepares for photosynthesis, which is crucial for energy production. During this phase, providing balanced fertilizers rich in nitrogen supports leaf growth. Using trellises or stakes helps the plants grow upright, improving air circulation and reducing disease risk. It’s also important to monitor for pests like aphids and cucumber beetles, addressing any issues promptly.
Read Also: Dry Farming in 2024
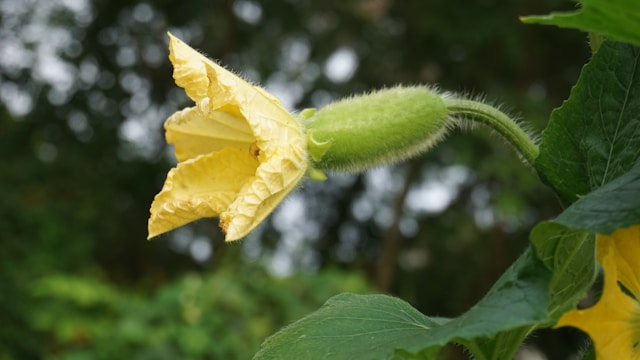
Stage 3: Flowering Stage
The flowering stage is a pivotal part of the Cucumber Growth Stages as the plant begins to produce flowers that will eventually develop into fruit. Both male and female flowers emerge, with male flowers typically appearing first, followed by female flowers, which can be identified by a small bump at the base. Encouraging pollinators like bees by planting companion flowers nearby can enhance pollination. If natural pollinators are scarce, you can manually transfer pollen from male to female flowers using a small brush.
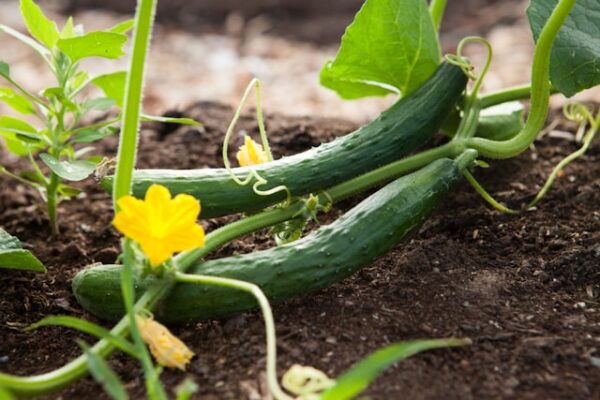
Stage 4: Fruiting Stage
The fruiting stage marks the transition from flowering to fruit development, another critical point in the Cucumber Growth Stages. After successful pollination, the small bump at the base of the female flower begins to swell, forming a cucumber. Depending on the variety, cucumbers can be ready to harvest in as little as 50 to 70 days after planting.
Stage 5: Harvesting
The final stage in the Cucumber Growth Stages is harvesting. Cucumbers should be picked when they reach 6 to 8 inches in length and have achieved the desired color. Regular harvesting encourages the plant to produce more fruit. After picking, cucumbers should be stored in a cool, moist environment to maintain freshness.
Senescence
After the harvesting stage, cucumber plants enter senescence, the natural aging process, where the plant gradually stops producing fruit, and the leaves yellow and die back. At this point, the growing season is over. Removing spent plants and adding them to your compost pile helps maintain soil health. Planning crop rotation for the next season can reduce soil depletion and minimize disease risks for future cucumber crops.
By understanding the Cucumber Growth Stages, gardeners can maximize their cucumber plants’ potential, leading to a fruitful and rewarding growing season. Whether you’re a seasoned gardener or new to the practice, this guide provides the essential knowledge needed to cultivate healthy, productive cucumber plants.
From the time you plant a cucumber seed until the first fruit is ready to pick, about 50 to 70 days have passed. You might see your first cucumber fruits as early as 20 days after putting a young plant from a garden shop, though. This depends on how mature the plant is. As long as you take good care of your plant and keep it healthy, you can have cucumbers all summer long
How to Harvest Cucumber Seeds
To guarantee you have the best collection, select cucumber seeds from plants without disease and create the sweetest fruit. Usually towards the end of the growing season, let the cucumber grow on the vine until it gets its full size to ensure the complete growth of the seeds. When completely matured, the fruit will turn orange or yellow to show it is ready for seed harvesting.
From pulpy fruits like cucumbers and tomatoes, we remove the seeds using the wet approach. Remove the seeds first, then arrange them in a jar filled with just a little warm water. Over three days, stir the mixture often to let it ferment. This procedure removes any viruses, eliminates the gel layer covering the seeds, sorts the healthy from the bad seeds and pulp. Three days will see the mushy and dead seeds float atop while the good seeds sink to the bottom. Carefully remove the floating trash, then distribute the good seeds on a screen or paper towels to totally dry off.
Arrange the seeds in boxes or a glass jar noting the date and type of seed after they are totally dry. For safety, the jar should be refrigerated for two days to eliminate any last insects. Store the seeds then in a cool, dry environment, like the refrigerator. Remember that seeds lose their capacity to develop with time; so, it is advisable to use them within three years.